Add Crops
Croparia IF allows you to define new crops that can produce customized materials.
You can create new crops using either the Dalarion way or by following the detailed steps below.
Additionally, you can use KubeJS. Refer to KubeJS Support - Add Crops for details.
Note: Your changes to custom crops take effect only after restarting the game.
I. Quick Crop Generation via Commands
Starting from Croparia IF 0.2.6, you can quickly create a custom crop definition using commands.
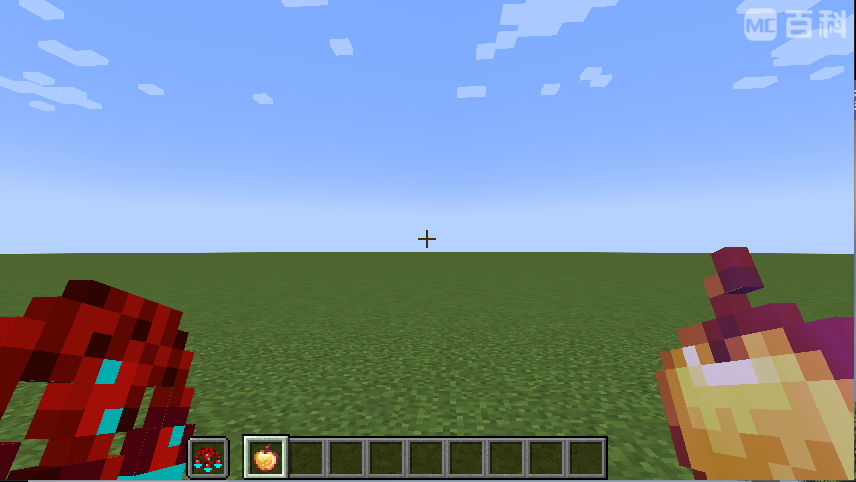
As shown in the image above, hold the material item you wish your crop to produce in your main hand, and the * Croparia item* (indicating the crop's tier) in your off hand.
Then execute one of the following commands:
-
Client-side (single-player/local):
/croparia create <color> [type] [name] -
Server-side (also works in single-player mode):
/cropariaServer create <color> [type] [name]
Command Arguments:
<color>(required): Crop's color as a hexadecimal number (e.g.,0xFF0000).[type](optional): Crop category (default iscrop). Other options includeanimal,food,monster, andnature.[name](optional): Identifier for the crop (defaults to the item's ID path).
Upon successful execution, a JSON file is created in your cropPath. Restart your game to activate
the changes.

You can directly open and modify this file by clicking the file path in the chat. For detailed editing instructions, refer to Text-based Crop Definitions.
If you receive the message "Duplicated crop... Try another name?", this means a crop with the same identifier
already exists, either built-in or in your cropPath.
![]()
Before creating a new definition, verify if an existing crop already satisfies your requirements. If not, use the "try another name" suggestion and choose a unique identifier.
II. Text-based Crop Definitions
Step 1: Identify the Material
You must specify which item the crop will produce.
Activate Minecraft's advanced item info with F3 + H, which displays item IDs in your inventory. Manually copy the
desired ID.
Alternatively, you may use an item tag (prefix with #). However, note that the crop will produce only the first
matching item for the given tag.
Example format:
{
  ...
  "material": "modid:item_id"
  // prefix with '#' if using item tag
  ...
}
Step 2: Define Crop ID
Croparia IF requires a unique ID for each crop definition, following Minecraft's identifier format (lowercase, no spaces, underscores allowed). Do not include namespaces.
Example format:
{
  ...
  "name": "unique_crop_id"
  ...
}
Step 3: Set Crop Tier
The crop's tier determines crafting difficulty—higher tiers require more complex materials. The default tier is 1.
Example format:
{
  ...
  "tier": 3
  ...
}
Step 4: Define Crop Color
Define the crop's visual color using a hexadecimal value.
Example format:
{
  ...
  "color": "0x8B8B8B"
  ...
}
Step 5: (Recommended) Declare Dependencies
Optionally specify mod dependencies to conditionally load crops.
Example format:
{
  ...
  "dependencies": [
    [
      "mod_a",
      "mod_b"
    ],
    [
      "mod_c"
    ]
  ]
  ...
}
Note:
- Inner arrays (
["mod_a", "mod_b"]) evaluate true if any listed mod is loaded. - Outer array evaluates true only if all inner arrays are true.
Step 6: (Optional) Crop Type
Crop types define default models and textures. Default type is crop.
Available types:
animalcropfoodmonsternature
Example format:
{
  ...
  "type": "animal"
  ...
}
Step 7: (Optional) Use Existing Translation Key
Croparia IF auto-generates a translation key:
crop.croparia.{crop_name}
Use a custom translation key if preferred.
Example format:
{
  ...
  "translationKey": "item.modid.item"
  ...
}
Step 8: (Optional) Customized Translations
If no suitable translation key exists, provide custom translations as shown:
{
  ...
  "translations": {
    "en_us": "Custom English name",
    "zh_cn": "自定义中文名称"
  }
  ...
}
Step 9: Create and Save Crop File
Place the JSON file in:
{GameDir}/crops/<filename>.json
A fully completed example (including optional fields):
{
  "name": "unique_crop_id",
  "material": "modid:item_id",
  "type": "crop",
  "tier": 3,
  "translationKey": "item.modid.item",
  "color": "0x8b8b8b",
  "translations": {
    "en_us": "Custom English name",
    "zh_cn": "自定义中文名称"
  }
}
Restart the game to see your custom crop in action!
Frequently Asked Questions (Q&A)
How can I modify existing crops?
- Using KubeJS:
Refer to KubeJS Support: Modify Crops for runtime modifications. - Using JSON definitions:
Create a crop definition file named identically to an existing crop to override it.
How can I remove a crop?
Use the blacklist setting in Configurations. Restart the game afterward to apply changes.